
Uploading to github through the API
You might ask why would you do this? Being theres at least 5-6 steps to do so.
However there’s a few interesting use cases that I can think of.
Potential Use cases
- Programmatically maintaining a static page. It might sound a bit silly, but one of the key things about github pages is there is no server in between. Where the programmatically stuff comes in is through a server less implementation such as amazon lambda. If you’re feeling enterprising, you can even set it up so your static page takes input from a facebook bot.
- Creating a mobile app to do some blogging. This is something that I’d like to do. I’ve already set up an image uploader and resizer for my blog which runs using Amazon S3 and Amazon Lambda. Serverless rocks because you can do more with less (money).
- Scripting the updating of github in some way (combine with another automated process?)
Summary
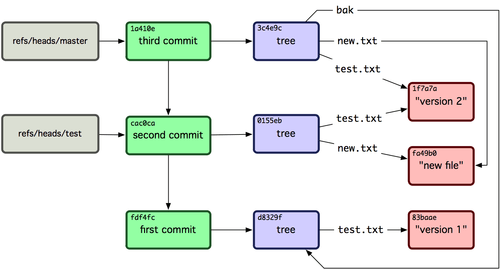
In summary, we’re grabbing the previous commit information, creating the file, doing the commit and moving the commit to the branch. Basically the git data API.
We’ve opted to use the personal API key to make things easier, but you can also use oauth with some more steps.
How to do this?
Preconditions
export GITHUBAPIKEY=apikey
export GITHUBUSER=username
export REPO=repo
Step 1 - Get the previous commit
You will need to get the SHA of last commit. The following link gets it from master
curl -u "$GITHUBUSER:$GITHUBAPIKEY" "https://api.github.com/repos/$GITHUBUSER/$REPO/git/refs/heads/master"
Outputs
The output is the SHA for the last commit
Step 2 - Get the tree of the previous commit
You will need to get the SHA of the base tree of the last commit. Where 4fcf7b332edf0ea47e4b0647743ff20ae3319b0b is the SHA of the last commit
curl -u "$GITHUBUSER:$GITHUBAPIKEY" "https://api.github.com/repos/$GITHUBUSER/$REPO/git/commits/4fcf7b332edf0ea47e4b0647743ff20ae3319b0b"
Outputs
The output is the SHA for the base tree of the last commit
Step 3 - Create the BLOB
Build a BLOB file. This will be what the file will contain
curl -u "$GITHUBUSER:$GITHUBAPIKEY" "https://api.github.com/repos/$GITHUBUSER/$REPO/git/blobs" -X POST \
-d '{"content": "# Hello World \n\n## Title 2\n\n", "encoding": "utf-8"}'
Outputs
Grab the SHA for this. You will need it on the next step.
Step 4 - Create the NEW tree
Create the tree using the proposed filename test.md, and blob sha. You will need to use the sha from STEP 2 here to put in the JSON.
curl -u "$GITHUBUSER:$GITHUBAPIKEY" "https://api.github.com/repos/$GITHUBUSER/$REPO/git/trees" -X POST \
-d '{"base_tree": "2bde088c1885f8420a13aec8b64813fd952fc81f","tree": [{"path": "test.md", "mode": "100644", "type": "blob", "sha": "86d7a63ee2b93d3b7ea31cea733754533fef67ad"}]}'
Output
Grab the SHA for the tree you just created
Step 5 - Do the commit
Create the commit with the tree in Step 4, and the SHA from step 1 (under parents).
Also specify the commit message
curl -u "$GITHUBUSER:$GITHUBAPIKEY" "https://api.github.com/repos/$GITHUBUSER/$REPO/git/commits" -X POST \
-d '{"parents": ["4fcf7b332edf0ea47e4b0647743ff20ae3319b0b"], "tree": "4d89626b8cf25e5487983162f563c7df2e3c362f", "message": "Update the file"}'
Output
The output is the SHA for the commit. We’re not done yet!
Step 6 - Move the commit to a branch
In this case, we’re just moving it to master
curl -u "$GITHUBUSER:$GITHUBAPIKEY" "https://api.github.com/repos/$GITHUBUSER/$REPO/git/refs/heads/master" -X POST \
-d '{"ref": "refs/heads/master", "sha": "61a98b50d65b2ffe57fc24ae828e2695b0d24457"}'
Output
If all goes well, the file should reflect on github.
Does this work?
YES! In fact this post is created purely through the github API (using the exact published code above). I’m a fan of dogfooding and open source. What I publish and talk about is what I use.
./upload.js draft_post.md _posts/2017-03-08-uploading-to-github-through-the-API.md
Got code?
Yes, I have some code which does this. In fact, I’ve also got a NPM Package available which does the above (and more) so you can use this in AWS Lambda too.